🗊Презентация Introducing the World Wide Web

Нажмите для полного просмотра!
Introducing the World Wide Web, слайд №1Introducing the World Wide Web, слайд №2Introducing the World Wide Web, слайд №3Introducing the World Wide Web, слайд №4Introducing the World Wide Web, слайд №5Introducing the World Wide Web, слайд №6Introducing the World Wide Web, слайд №7Introducing the World Wide Web, слайд №8Introducing the World Wide Web, слайд №9Introducing the World Wide Web, слайд №10Introducing the World Wide Web, слайд №11Introducing the World Wide Web, слайд №12Introducing the World Wide Web, слайд №13Introducing the World Wide Web, слайд №14Introducing the World Wide Web, слайд №15Introducing the World Wide Web, слайд №16Introducing the World Wide Web, слайд №17Introducing the World Wide Web, слайд №18Introducing the World Wide Web, слайд №19Introducing the World Wide Web, слайд №20Introducing the World Wide Web, слайд №21Introducing the World Wide Web, слайд №22Introducing the World Wide Web, слайд №23Introducing the World Wide Web, слайд №24Introducing the World Wide Web, слайд №25Introducing the World Wide Web, слайд №26Introducing the World Wide Web, слайд №27Introducing the World Wide Web, слайд №28Introducing the World Wide Web, слайд №29Introducing the World Wide Web, слайд №30Introducing the World Wide Web, слайд №31Introducing the World Wide Web, слайд №32Introducing the World Wide Web, слайд №33Introducing the World Wide Web, слайд №34Introducing the World Wide Web, слайд №35Introducing the World Wide Web, слайд №36Introducing the World Wide Web, слайд №37Introducing the World Wide Web, слайд №38Introducing the World Wide Web, слайд №39Introducing the World Wide Web, слайд №40Introducing the World Wide Web, слайд №41Introducing the World Wide Web, слайд №42Introducing the World Wide Web, слайд №43Introducing the World Wide Web, слайд №44Introducing the World Wide Web, слайд №45Introducing the World Wide Web, слайд №46Introducing the World Wide Web, слайд №47Introducing the World Wide Web, слайд №48Introducing the World Wide Web, слайд №49Introducing the World Wide Web, слайд №50Introducing the World Wide Web, слайд №51Introducing the World Wide Web, слайд №52Introducing the World Wide Web, слайд №53Introducing the World Wide Web, слайд №54Introducing the World Wide Web, слайд №55Introducing the World Wide Web, слайд №56Introducing the World Wide Web, слайд №57Introducing the World Wide Web, слайд №58Introducing the World Wide Web, слайд №59

Содержание

Вы можете ознакомиться и скачать презентацию на тему Introducing the World Wide Web. Доклад-сообщение содержит 59 слайдов. Презентации для любого класса можно скачать бесплатно. Если материал и наш сайт презентаций Mypresentation Вам понравились – поделитесь им с друзьями с помощью социальных кнопок и добавьте в закладки в своем браузере.
Слайды и текст этой презентации


Слайд 1


Lecture 1-2
Senior-Lecturer: Sarsenova Zh.N.
Описание слайда:
Lecture 1-2 Senior-Lecturer: Sarsenova Zh.N.

Слайд 2


Introducing the World Wide Web
In 1969, the first transmission over the Internet took place
Web pages are the basic unit of a website, and every website is a collection of one or more pages
Описание слайда:
Introducing the World Wide Web In 1969, the first transmission over the Internet took place Web pages are the basic unit of a website, and every website is a collection of one or more pages

Слайд 3


Introducing HTML: The Language of the Web
Web pages are written in HTML (HyperText Markup Language)
A markup language is a set of markup tags
It tells browsers how to display the contents of a web page, using special instructions (called tags) that instruct the browser when to start a paragraph, italicize a word, or display a picture
Описание слайда:
Introducing HTML: The Language of the Web Web pages are written in HTML (HyperText Markup Language) A markup language is a set of markup tags It tells browsers how to display the contents of a web page, using special instructions (called tags) that instruct the browser when to start a paragraph, italicize a word, or display a picture

Слайд 4


Creating an HTML File
Fire up your favorite text editor
Start writing HTML content.
When you finish your web page, save the document. In the Encoding list, choose UTF-8.
When you name your file, use the extension .htm or .html
Описание слайда:
Creating an HTML File Fire up your favorite text editor Start writing HTML content. When you finish your web page, save the document. In the Encoding list, choose UTF-8. When you name your file, use the extension .htm or .html

Слайд 5


HTML Tags
HTML tags are formatting instructions that tell a browser how to transform ordinary text into something visually appealing. If you were to take all the tags out of an HTML document, the resulting page would consist of nothing more than plain, unformatted text.
Описание слайда:
HTML Tags HTML tags are formatting instructions that tell a browser how to transform ordinary text into something visually appealing. If you were to take all the tags out of an HTML document, the resulting page would consist of nothing more than plain, unformatted text.

Слайд 6


What’s in a Tag
To create a tag, you type HTML code between the brackets. (look like this: < >)
For example, one simple tag is the <b>tag, which stands for “bold” (tag names are always lowercase).
As you’ve seen, tags come in pairs. When you use a start tag (like <b> for bold), you have to include an end tag (like </b> ). This combination of start and end tags and the text in between them makes up an HTML element.
Описание слайда:
What’s in a Tag To create a tag, you type HTML code between the brackets. (look like this: < >) For example, one simple tag is the <b>tag, which stands for “bold” (tag names are always lowercase). As you’ve seen, tags come in pairs. When you use a start tag (like <b> for bold), you have to include an end tag (like </b> ). This combination of start and end tags and the text in between them makes up an HTML element.

Слайд 7


Example 1
Описание слайда:
Example 1

Слайд 8


Types of elements:
Container elements are, by far, the most common type. They apply formatting to the content nestled between the start and end tags. 
Standalone elements don’t turn formatting on or off. Instead, they insert something, like an image, into a page. One example is the  <br>
element, which inserts a line break in a page. Standalone elements don’t come in pairs, as container elements do, and you may hear them referred to as empty elements because you can’t put any text inside them.
Описание слайда:
Types of elements: Container elements are, by far, the most common type. They apply formatting to the content nestled between the start and end tags. Standalone elements don’t turn formatting on or off. Instead, they insert something, like an image, into a page. One example is the <br> element, which inserts a line break in a page. Standalone elements don’t come in pairs, as container elements do, and you may hear them referred to as empty elements because you can’t put any text inside them.

Слайд 9


Nesting Elements
Nesting elements is one of the basic building block techniques of web pages. 
You can also nest elements to create more complicated page components, like bulleted lists.
Описание слайда:
Nesting Elements Nesting elements is one of the basic building block techniques of web pages. You can also nest elements to create more complicated page components, like bulleted lists.

Слайд 10


Example 3
This <b><i>word </i></b> has italic and bold formatting.
This word has italic and bold formatting
Описание слайда:
Example 3 This <b><i>word </i></b> has italic and bold formatting. This word has italic and bold formatting

Слайд 11


DOCTYPE element
DOCTYPE – tells process Web files  - such as validators, Web browsers,  etc. about the HTML specification used in the file’s source.
The document type definition (DTD) is the first piece of information in an HTML file. Always on the first line of a file, before beginning <HTML> tag.
It tells the browser what markup standard you used to write the page.
Описание слайда:
DOCTYPE element DOCTYPE – tells process Web files - such as validators, Web browsers, etc. about the HTML specification used in the file’s source. The document type definition (DTD) is the first piece of information in an HTML file. Always on the first line of a file, before beginning <HTML> tag. It tells the browser what markup standard you used to write the page.

Слайд 12


Main HTML Components
Any HTML document begins with the following tag pair
<html> - This element wraps everything (other than the doctype) in your web page.
<head> - This element designates the header portion of your document. The header can include some optional information about your web page, including the required title, optional search keywords, and an optional style sheet
<body> - This element holds the meat of your web page, including the actual content you want to display to the world.
<title> </title> -element of the title  
<p></p> - paragraph tag
<!--and --> - comments tag
Описание слайда:
Main HTML Components Any HTML document begins with the following tag pair <html> - This element wraps everything (other than the doctype) in your web page. <head> - This element designates the header portion of your document. The header can include some optional information about your web page, including the required title, optional search keywords, and an optional style sheet <body> - This element holds the meat of your web page, including the actual content you want to display to the world. <title> </title> -element of the title <p></p> - paragraph tag <!--and --> - comments tag

Слайд 13


HTML Page Structure
Описание слайда:
HTML Page Structure

Слайд 14


Physical Styles
Certain styles can be enforced to the browser by using following tags.
<B> </B>		Bold
<I></I>			Italics
<TT></TT>		Monospace (fixed width)
<U></U>		Underline
<SUB></SUB>		Subscript
<SUP></SUP>		 Superscript
Описание слайда:
Physical Styles Certain styles can be enforced to the browser by using following tags. <B> </B> Bold <I></I> Italics <TT></TT> Monospace (fixed width) <U></U> Underline <SUB></SUB> Subscript <SUP></SUP> Superscript

Слайд 15


Logical Style
Описание слайда:
Logical Style

Слайд 16


Size and Color
Описание слайда:
Size and Color

Слайд 17


Other elements
Описание слайда:
Other elements

Слайд 18


Other elements
Описание слайда:
Other elements

Слайд 19


Horizontal Lines
Описание слайда:
Horizontal Lines

Слайд 20


Preformatted Text
Описание слайда:
Preformatted Text

Слайд 21


Lists
Описание слайда:
Lists

Слайд 22


Linking other pages
Описание слайда:
Linking other pages

Слайд 23


Creating Links to Other Files
Описание слайда:
Creating Links to Other Files

Слайд 24


Creating Internal Links
Описание слайда:
Creating Internal Links

Слайд 25


Embedding image in Web Page
Описание слайда:
Embedding image in Web Page

Слайд 26


HTML Table
Описание слайда:
HTML Table

Слайд 27


HTML Table Syntax
Описание слайда:
HTML Table Syntax

Слайд 28


Images and Multimedia - I
Описание слайда:
Images and Multimedia - I

Слайд 29


Images and Multimedia - I
Описание слайда:
Images and Multimedia - I

Слайд 30


Home work
Home work
Read from book 19-35 pages
Book: Creating a Web Site: Missing Manual
Описание слайда:
Home work Home work Read from book 19-35 pages Book: Creating a Web Site: Missing Manual

Слайд 31


Question
Give examples of container element
Give examples of standalone element
Описание слайда:
Question Give examples of container element Give examples of standalone element

Слайд 32


Understanding Images
To display pictures on a page, you use the <img> element in your HTML document
Example
	<img src="photo01.jpg" />
Standalone
Inline element (you can put them inside inside other block element, like paragraph)
<p><img src="photo01.jpg" /></p>
Описание слайда:
Understanding Images To display pictures on a page, you use the <img> element in your HTML document Example <img src="photo01.jpg" /> Standalone Inline element (you can put them inside inside other block element, like paragraph) <p><img src="photo01.jpg" /></p>

Слайд 33


Alternate text
Attributes: src and alt
src – location of the image
alt- if the user for some reason cannot view it (slow connection)
Описание слайда:
Alternate text Attributes: src and alt src – location of the image alt- if the user for some reason cannot view it (slow connection)

Слайд 34


Examples of <img> with attributes
<img src="wrongname.gif" alt="HTML5 Icon“/>
To add pop-up text, use title attribute:
<img src="matador.jpg"
alt="A matador extends his cape in welcome."
title="Welcome to the ring." />
Описание слайда:
Examples of <img> with attributes <img src="wrongname.gif" alt="HTML5 Icon“/> To add pop-up text, use title attribute: <img src="matador.jpg" alt="A matador extends his cape in welcome." title="Welcome to the ring." />

Слайд 35


Picture Size
Web weavers measure graphics in units called pixels. 
A pixel represents one tiny dot on a computer screen.
<img src="photo01.jpg" alt="An explicitly sized picture" width="100“ height="150" />
Описание слайда:
Picture Size Web weavers measure graphics in units called pixels. A pixel represents one tiny dot on a computer screen. <img src="photo01.jpg" alt="An explicitly sized picture" width="100“ height="150" />

Слайд 36


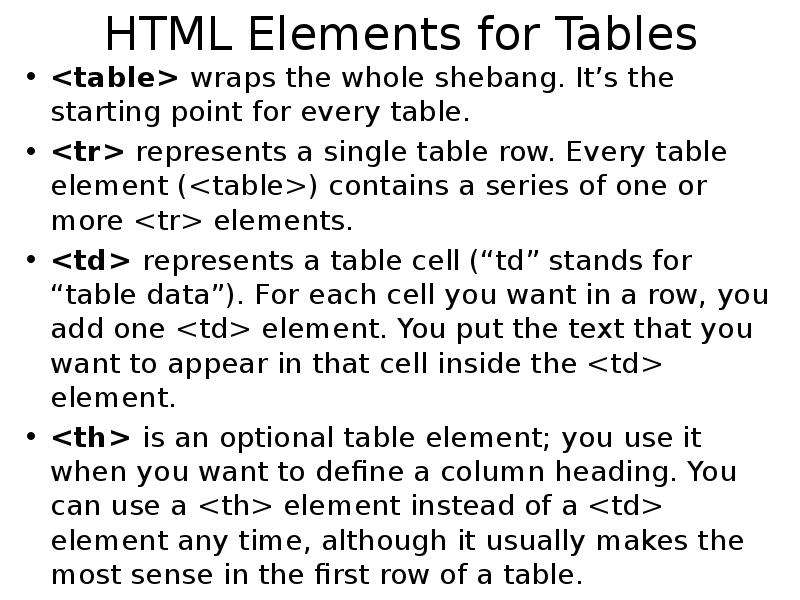
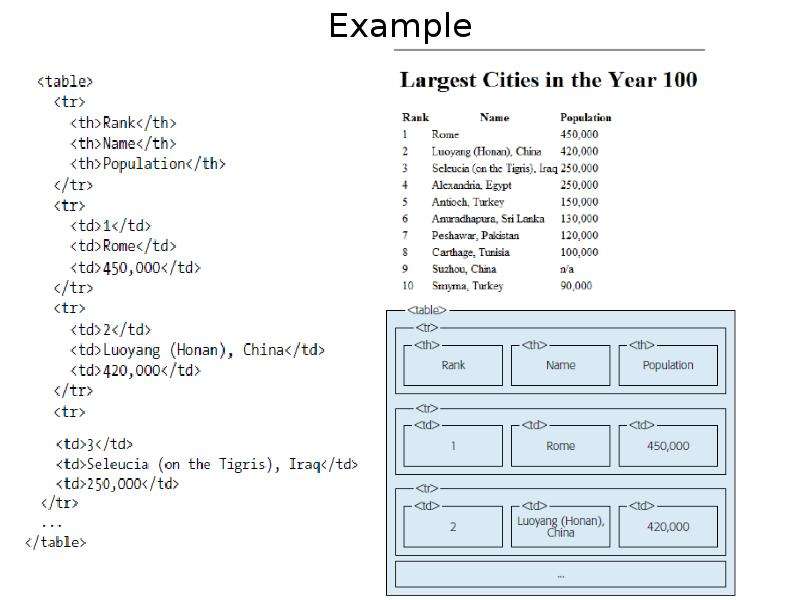
HTML Elements for Tables
<table> wraps the whole shebang. It’s the starting point for every table.
<tr> represents a single table row. Every table element (<table>) contains a series of one or more <tr> elements.
<td> represents a table cell (“td” stands for “table data”). For each cell you want in a row, you add one <td> element. You put the text that you want to appear in that cell inside the <td> element.
<th> is an optional table element; you use it when you want to define a column heading. You can use a <th> element instead of a <td> element any time, although it usually makes the most sense in the first row of a table.
Описание слайда:
HTML Elements for Tables <table> wraps the whole shebang. It’s the starting point for every table. <tr> represents a single table row. Every table element (<table>) contains a series of one or more <tr> elements. <td> represents a table cell (“td” stands for “table data”). For each cell you want in a row, you add one <td> element. You put the text that you want to appear in that cell inside the <td> element. <th> is an optional table element; you use it when you want to define a column heading. You can use a <th> element instead of a <td> element any time, although it usually makes the most sense in the first row of a table.

Слайд 37


Example
Описание слайда:
Example

Слайд 38


HTML Forms
Описание слайда:
HTML Forms

Слайд 39


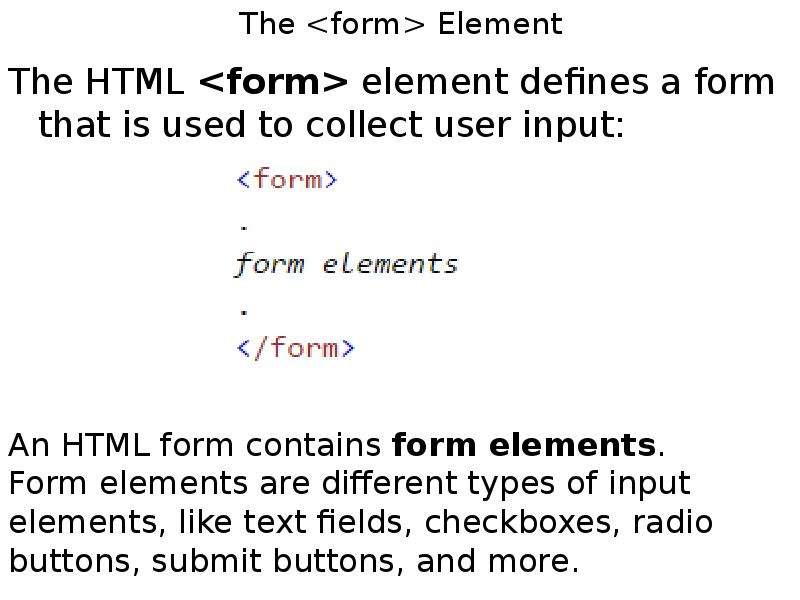
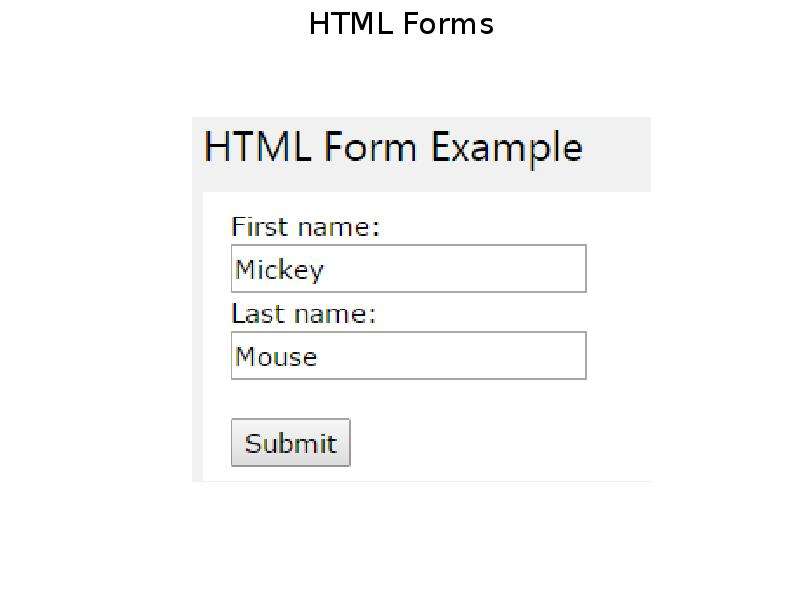
The <form> Element
The HTML <form> element defines a form that is used to collect user input:
Описание слайда:
The <form> Element The HTML <form> element defines a form that is used to collect user input:

Слайд 40


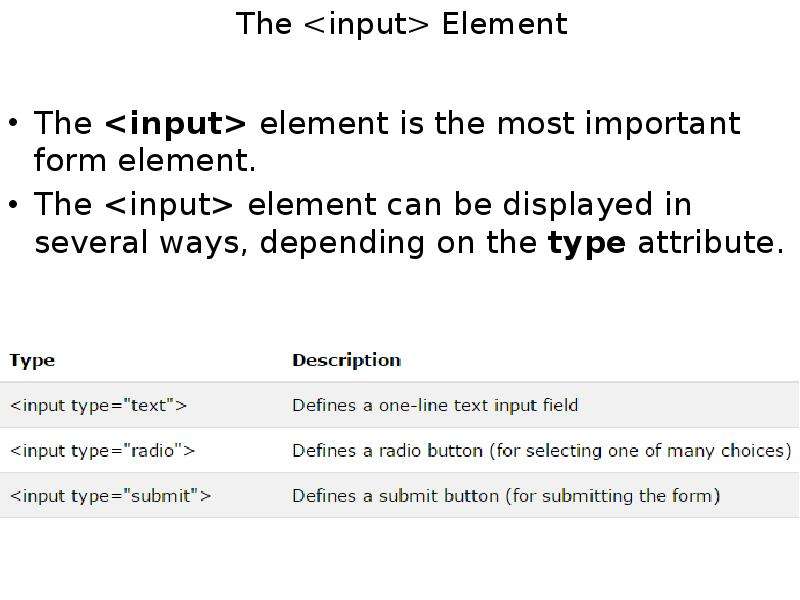
The <input> Element
The <input> element is the most important form element.
The <input> element can be displayed in several ways, depending on the type attribute.
Описание слайда:
The <input> Element The <input> element is the most important form element. The <input> element can be displayed in several ways, depending on the type attribute.

Слайд 41


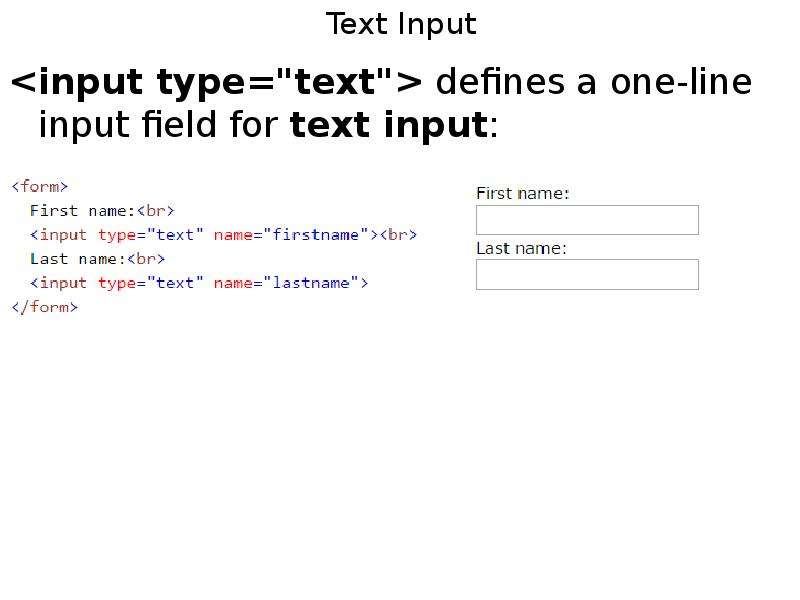
Text Input
<input type="text"> defines a one-line input field for text input:
Описание слайда:
Text Input <input type="text"> defines a one-line input field for text input:

Слайд 42


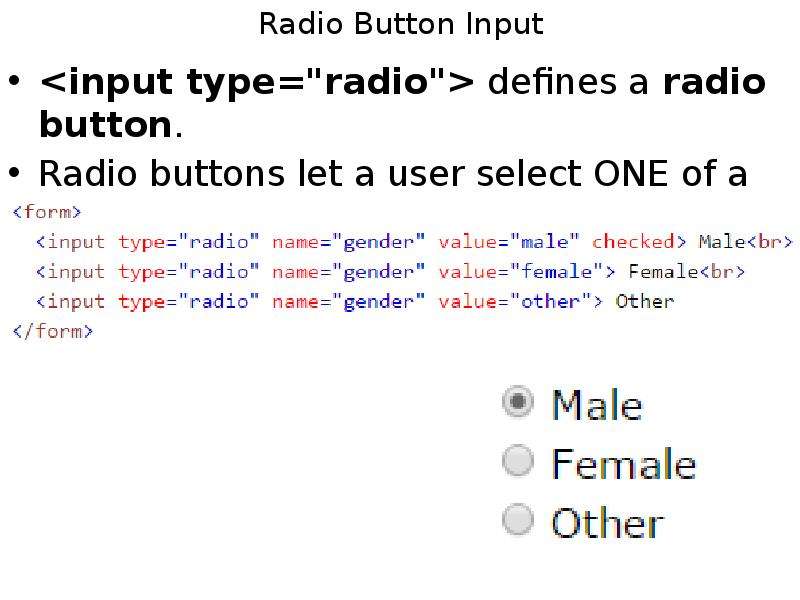
Radio Button Input
<input type="radio"> defines a radio button.
Radio buttons let a user select ONE of a limited number of choices:
Описание слайда:
Radio Button Input <input type="radio"> defines a radio button. Radio buttons let a user select ONE of a limited number of choices:

Слайд 43


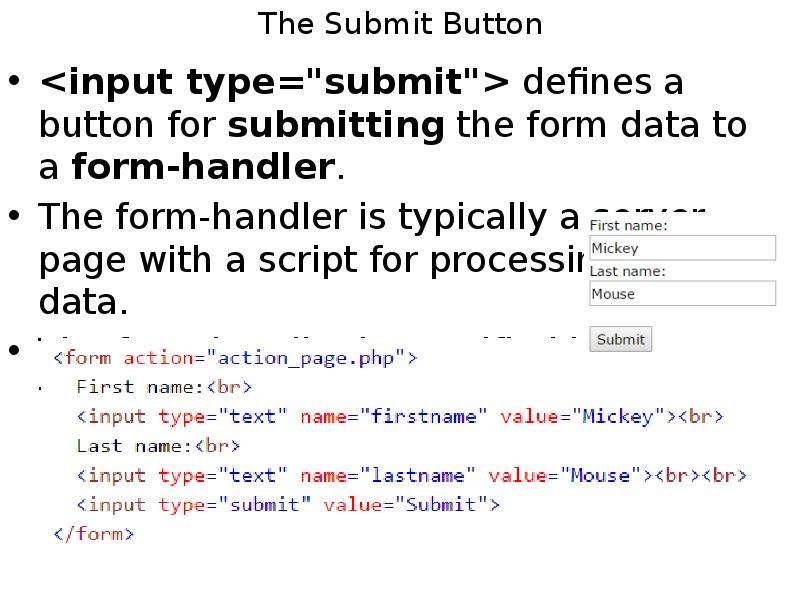
The Submit Button
<input type="submit"> defines a button for submitting the form data to a form-handler.
The form-handler is typically a server page with a script for processing input data.
The form-handler is specified in the form's action attribute:
Описание слайда:
The Submit Button <input type="submit"> defines a button for submitting the form data to a form-handler. The form-handler is typically a server page with a script for processing input data. The form-handler is specified in the form's action attribute:

Слайд 44


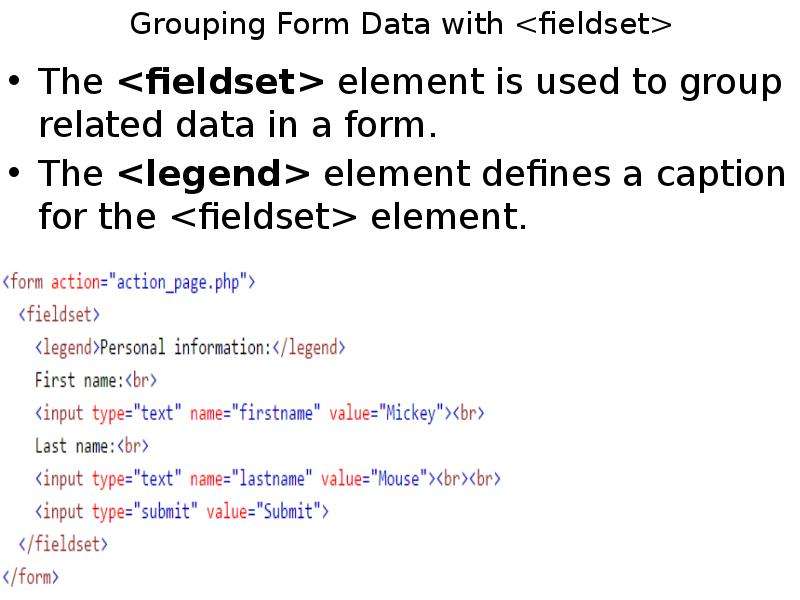
Grouping Form Data with <fieldset>
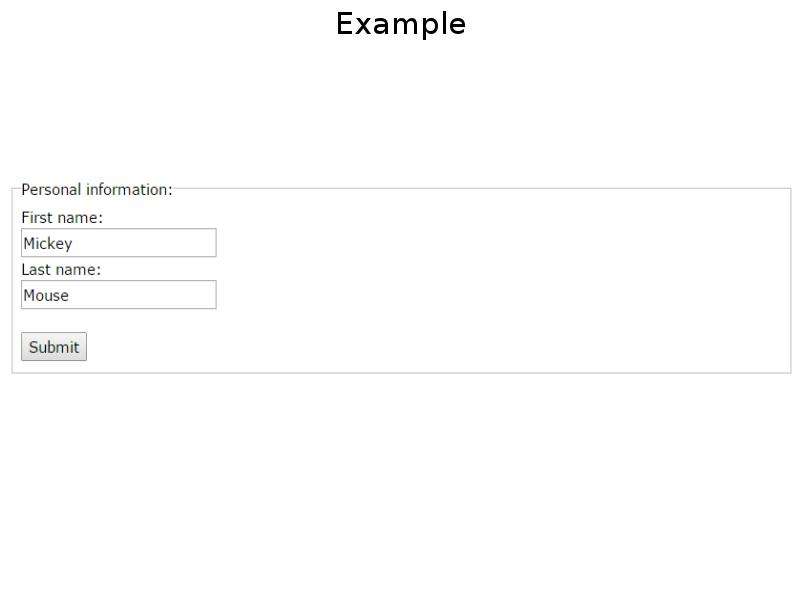
The <fieldset> element is used to group related data in a form.
The <legend> element defines a caption for the <fieldset> element.
Описание слайда:
Grouping Form Data with <fieldset> The <fieldset> element is used to group related data in a form. The <legend> element defines a caption for the <fieldset> element.

Слайд 45


Example
Описание слайда:
Example

Слайд 46


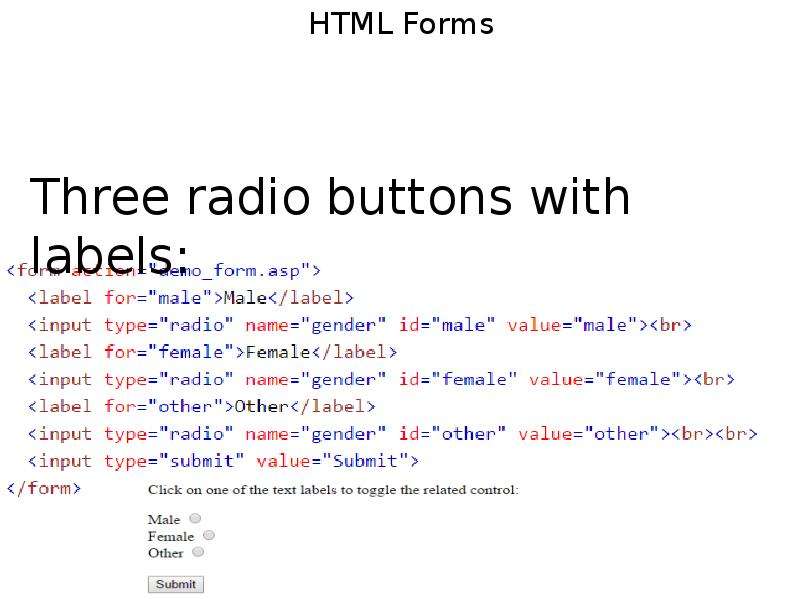
Label Element
The <label> tag defines a label for an <input> element.
The <label> element does not render as anything special for the user. However, it provides a usability improvement for mouse users, because if the user clicks on the text within the <label> element, it toggles the control.
Описание слайда:
Label Element The <label> tag defines a label for an <input> element. The <label> element does not render as anything special for the user. However, it provides a usability improvement for mouse users, because if the user clicks on the text within the <label> element, it toggles the control.

Слайд 47


HTML Forms
Описание слайда:
HTML Forms

Слайд 48


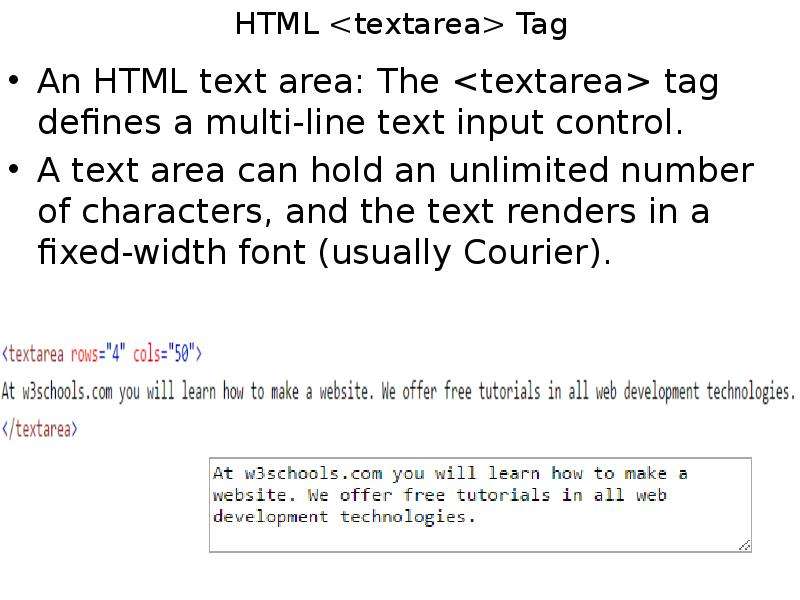
HTML <textarea> Tag
An HTML text area: The <textarea> tag defines a multi-line text input control.
A text area can hold an unlimited number of characters, and the text renders in a fixed-width font (usually Courier).
Описание слайда:
HTML <textarea> Tag An HTML text area: The <textarea> tag defines a multi-line text input control. A text area can hold an unlimited number of characters, and the text renders in a fixed-width font (usually Courier).

Слайд 49


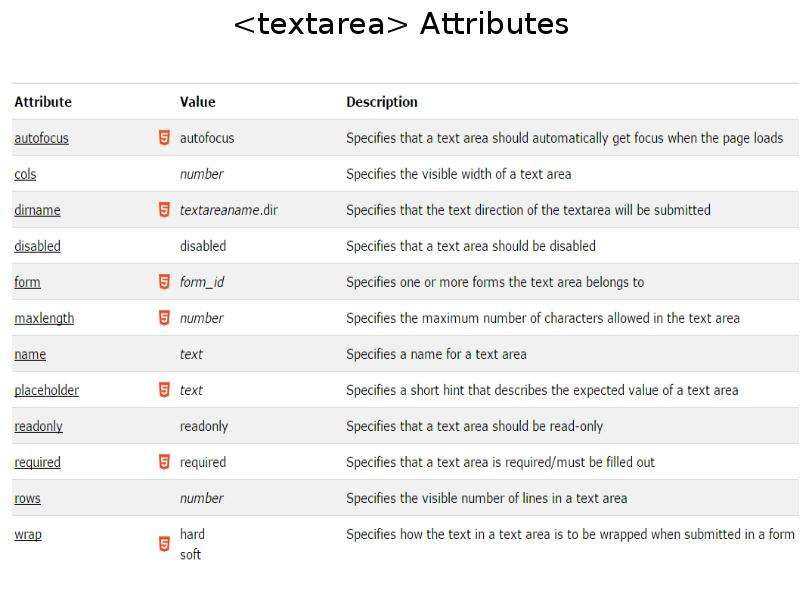
<textarea> Attributes
Описание слайда:
<textarea> Attributes

Слайд 50


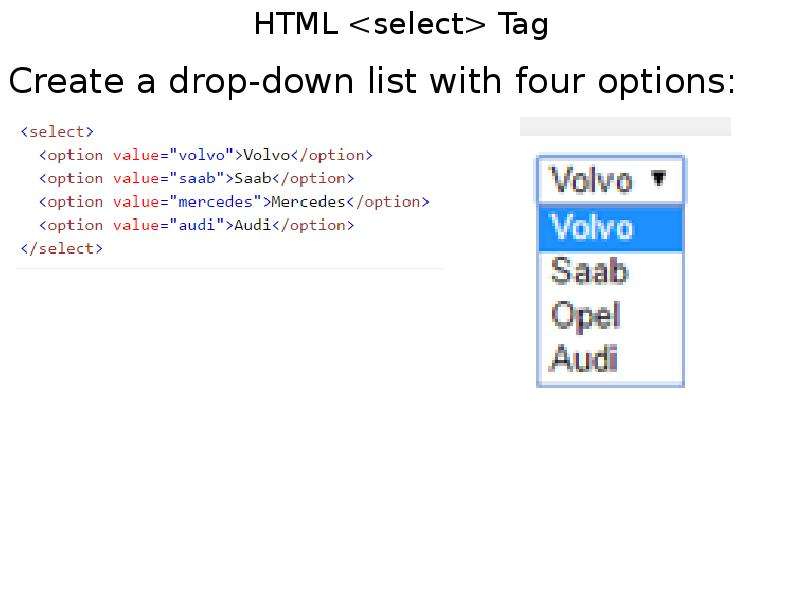
HTML <select> Tag
Create a drop-down list with four options:
Описание слайда:
HTML <select> Tag Create a drop-down list with four options:

Слайд 51


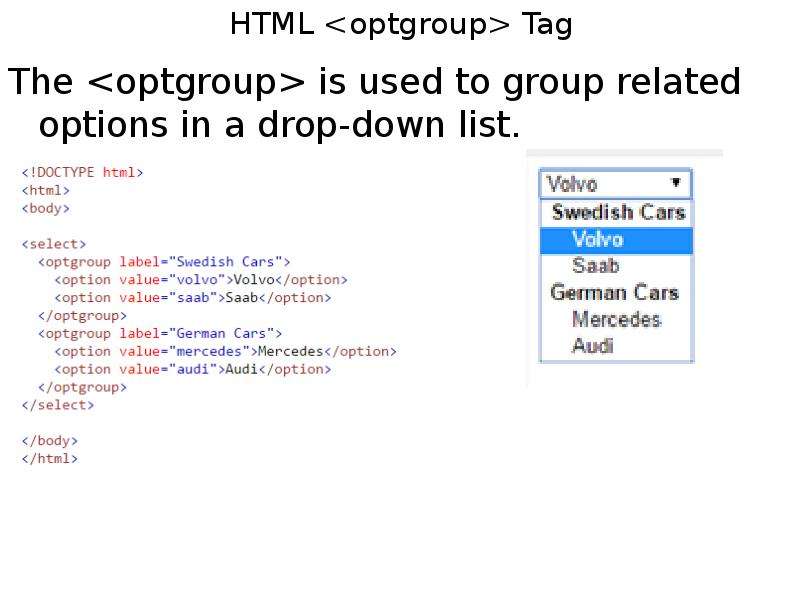
HTML <optgroup> Tag
The <optgroup> is used to group related options in a drop-down list.
Описание слайда:
HTML <optgroup> Tag The <optgroup> is used to group related options in a drop-down list.

Слайд 52


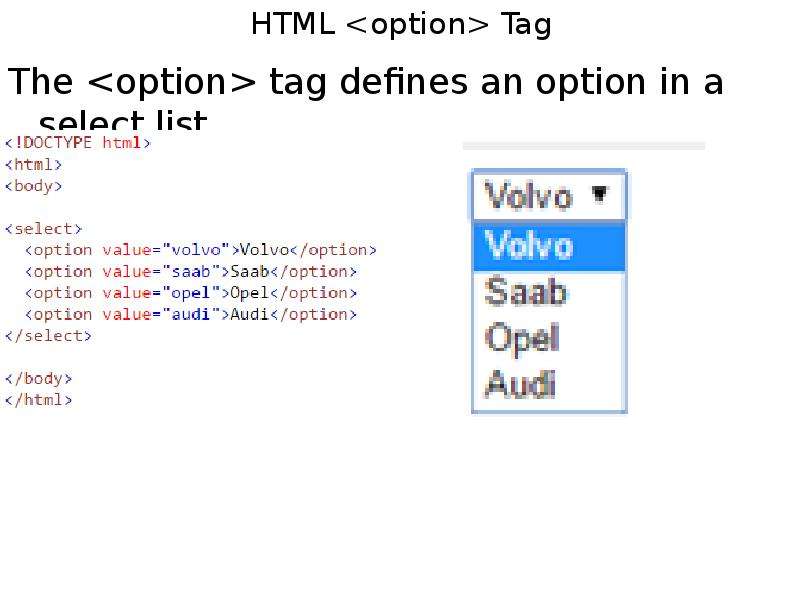
HTML <option> Tag
The <option> tag defines an option in a select list.
Описание слайда:
HTML <option> Tag The <option> tag defines an option in a select list.

Слайд 53


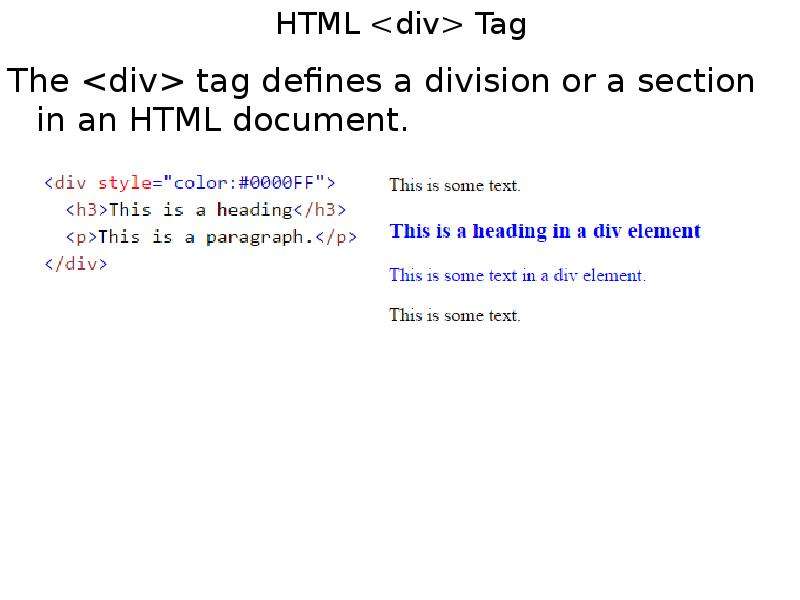
HTML <div> Tag
The <div> tag defines a division or a section in an HTML document.
Описание слайда:
HTML <div> Tag The <div> tag defines a division or a section in an HTML document.

Слайд 54


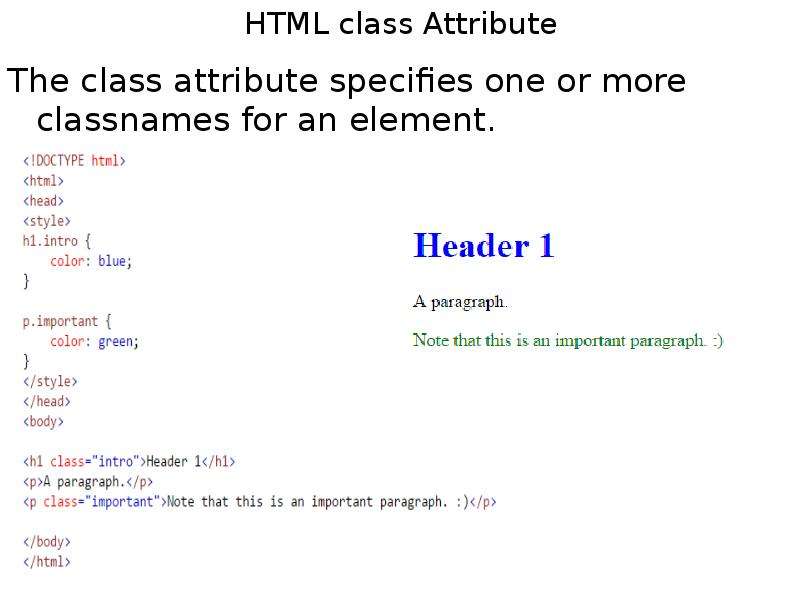
HTML class Attribute
The class attribute specifies one or more classnames for an element.
Описание слайда:
HTML class Attribute The class attribute specifies one or more classnames for an element.

Слайд 55


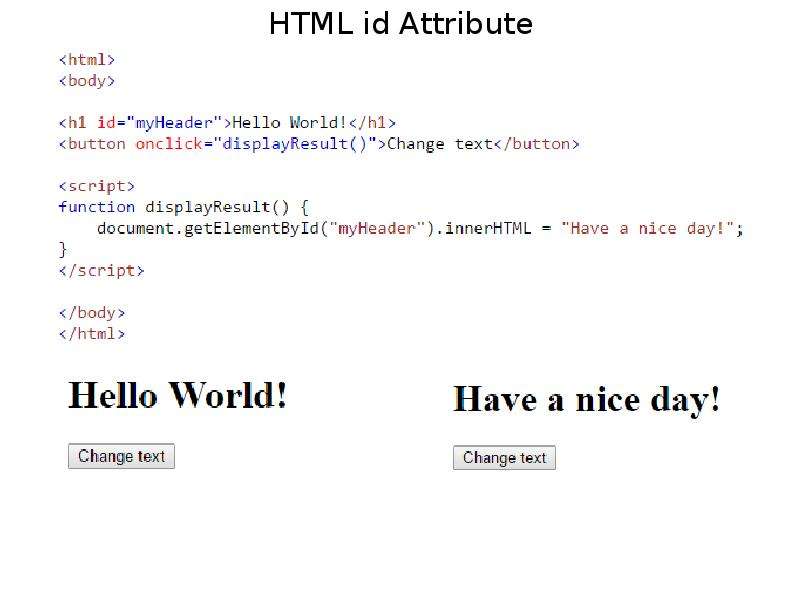
HTML id Attribute
Описание слайда:
HTML id Attribute

Слайд 56


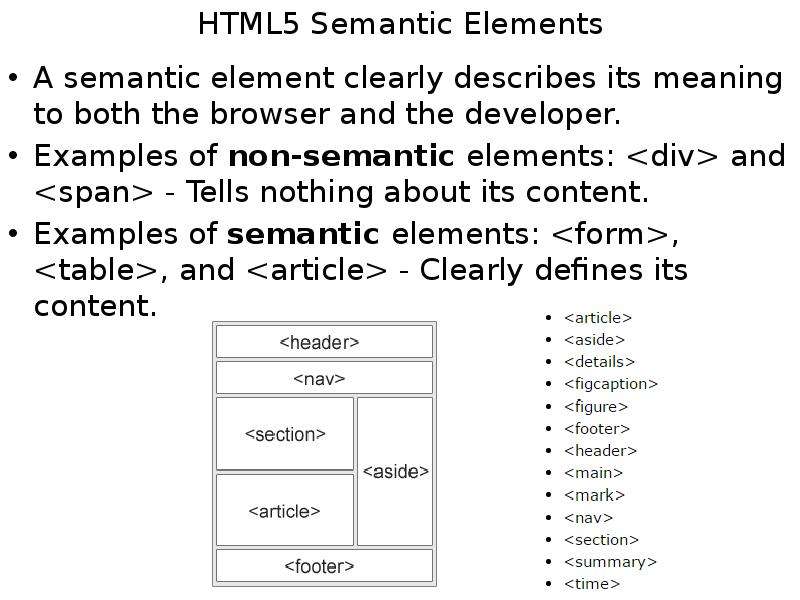
HTML5 Semantic Elements
A semantic element clearly describes its meaning to both the browser and the developer.
Examples of non-semantic elements: <div> and <span> - Tells nothing about its content.
Examples of semantic elements: <form>, <table>, and <article> - Clearly defines its content.
Описание слайда:
HTML5 Semantic Elements A semantic element clearly describes its meaning to both the browser and the developer. Examples of non-semantic elements: <div> and <span> - Tells nothing about its content. Examples of semantic elements: <form>, <table>, and <article> - Clearly defines its content.

Слайд 57


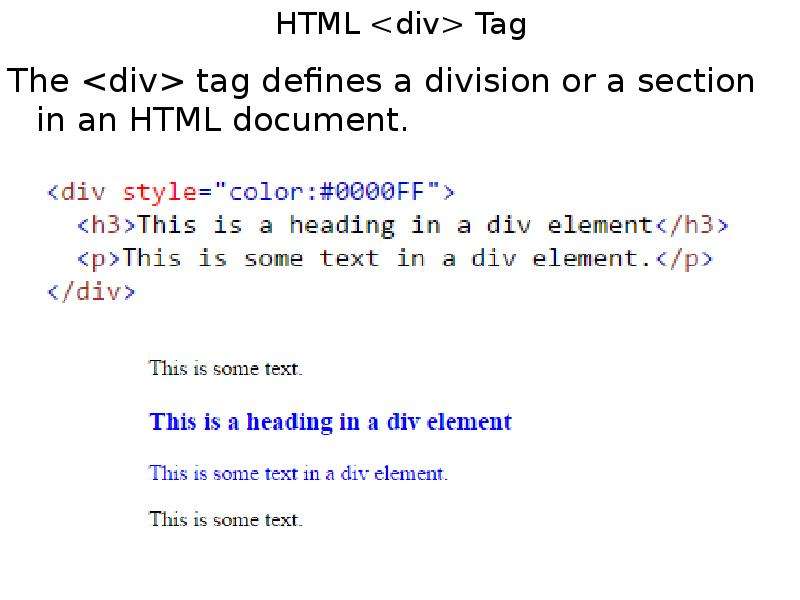
HTML <div> Tag
The <div> tag defines a division or a section in an HTML document.
Описание слайда:
HTML <div> Tag The <div> tag defines a division or a section in an HTML document.

Слайд 58


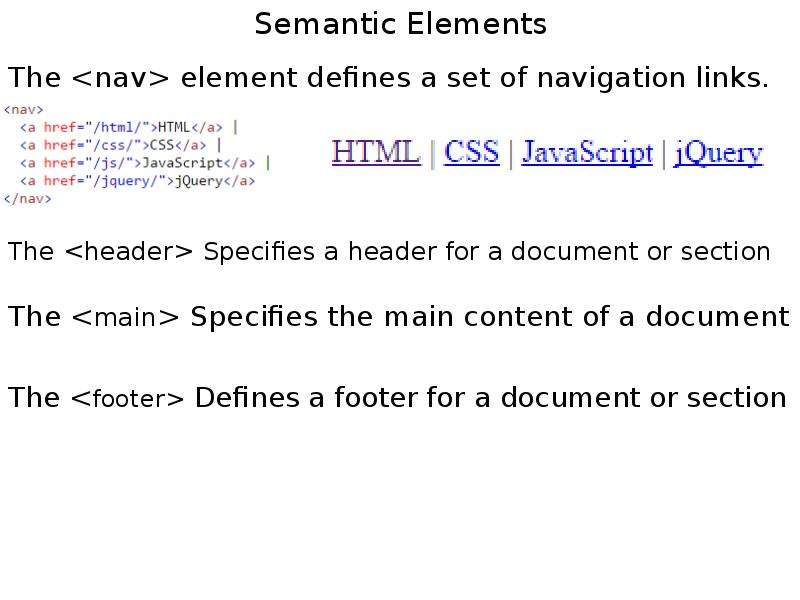
Semantic Elements
The <nav> element defines a set of navigation links.
Описание слайда:
Semantic Elements The <nav> element defines a set of navigation links.

Слайд 59


Home Work
Read CHAPTER 5
Описание слайда:
Home Work Read CHAPTER 5


Похожие презентации
Mypresentation.ru
Загрузить презентацию